Making Cards with Friends Forever Stamps from Clearly Besotted Stamps!

I did the coloring on camera over a month ago, but haven’t felt well enough to do much video editing.
So I’m sorry, but there is no voice-over.
But if you’d like to see how I did the color and blending with my Spectrum Noir Alcohol Markers, please check out the video.
And I’d love to hear your thoughts and ideas, so please comment on this post, and in the video comments.
Supplies:
* By the way, this post may contain affiliate links. That means that, if you purchase something through the link, I’ll get a small commission at no extra charge to you. Thanks for supporting my YouTube channel and blog..

Clearly Besotted “Friends Forever”

(good for alcohol ink coloring)
        <h2>Tutorial</h2>
    https://youtu.be/aU4A97DhXu4<p>Check out my new process video.
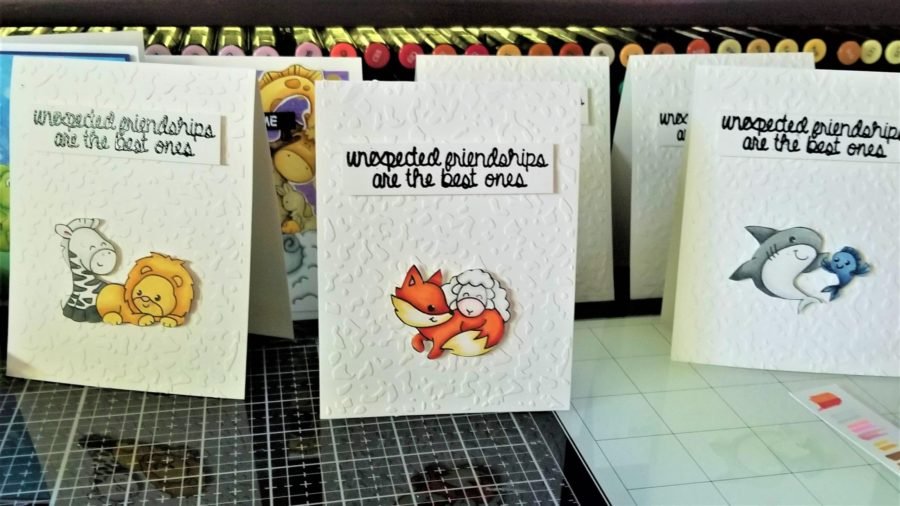
This is such a super cute stamp set that I just couldn’t resist making some simple cards with them. And I think I have a thing for foxes and sheep… I’ve started collecting stamps and dies mostly because of my Mom-in-law. She loves foxes and knitting, so this little stamp was perfect to create something (later) for her.


Although I’ve been experimenting with different coloring mediums lately, I fell back to my standard go-to method: Spectrum Noir Alcohol Markers. I did some easy blending (I’m getting a little better at using the colorless blender marker for light coloring to give depth to white areas… I’ve struggled with this for a while.)
Once I finished the coloring, I cut the images out with my ScanNCut machine. The cut-out images were popped up with foam tape on a white embossed cardbase. (I’m not sure what the name and brand is for the embossing folder but I think it came from one of the stamp packs I picked up from Michaels or Joannes in the last year or so… maybe I’ll figure it out as I update my inventory system – tutorial coming soon!)
Update! The embossing folder is from a stamp and emboss set from Studio G. The stamp in the set is a “blue ribbon” that says “best in class”. I’ll use it on a future project. The downside is that google can’t seem to find it anywhere. Copyright date on the package is 2018.
I love the textured white on white look that this made.


Last step was finding a cute sentiment to add to these cards. I love the one from the set that says “Unexpected friendships are the best ones”. It was just perfect. So I heat embossed it in black on some white cardstock scraps. I popped the sentiment strips to the card front with foam tape too, and added a few gems.
And that finished off the cards for todays project. I hope that this inspires your creativity and I’d love to see your creations!

While you’re here, I’d like to invite you to join me and some other crafty people in my “Crafting with Debbie” Facebook group. It’s going to be so much fun!
I’ll be giving my members sneak peeks and early offerings of lots of crafty goodness. We are currently doing swaps, challenges and a weekly “Craft with Me” Facebook Live video. And I’m always looking for more ideas.
We’d love to have you join us!

Deb Jenkins
Cardmaker & Crafter extraordinaire!
This Florida girl loves sharing handmade kindness!
Stalk me: Facebook | Pinterest | Instagram | YouTube | Blog
Visit my channel and Blog for tutorials, inspiration, and motivation! New posts every week!


 Amazon
